Drag and Drop Upload with FilePond

Continuing the discussion from Multiple Files & Upload Preview:

Working Demo Here


Looking for a little direction here.

@Chem or @moe, maybe you could chime in here if you have time.


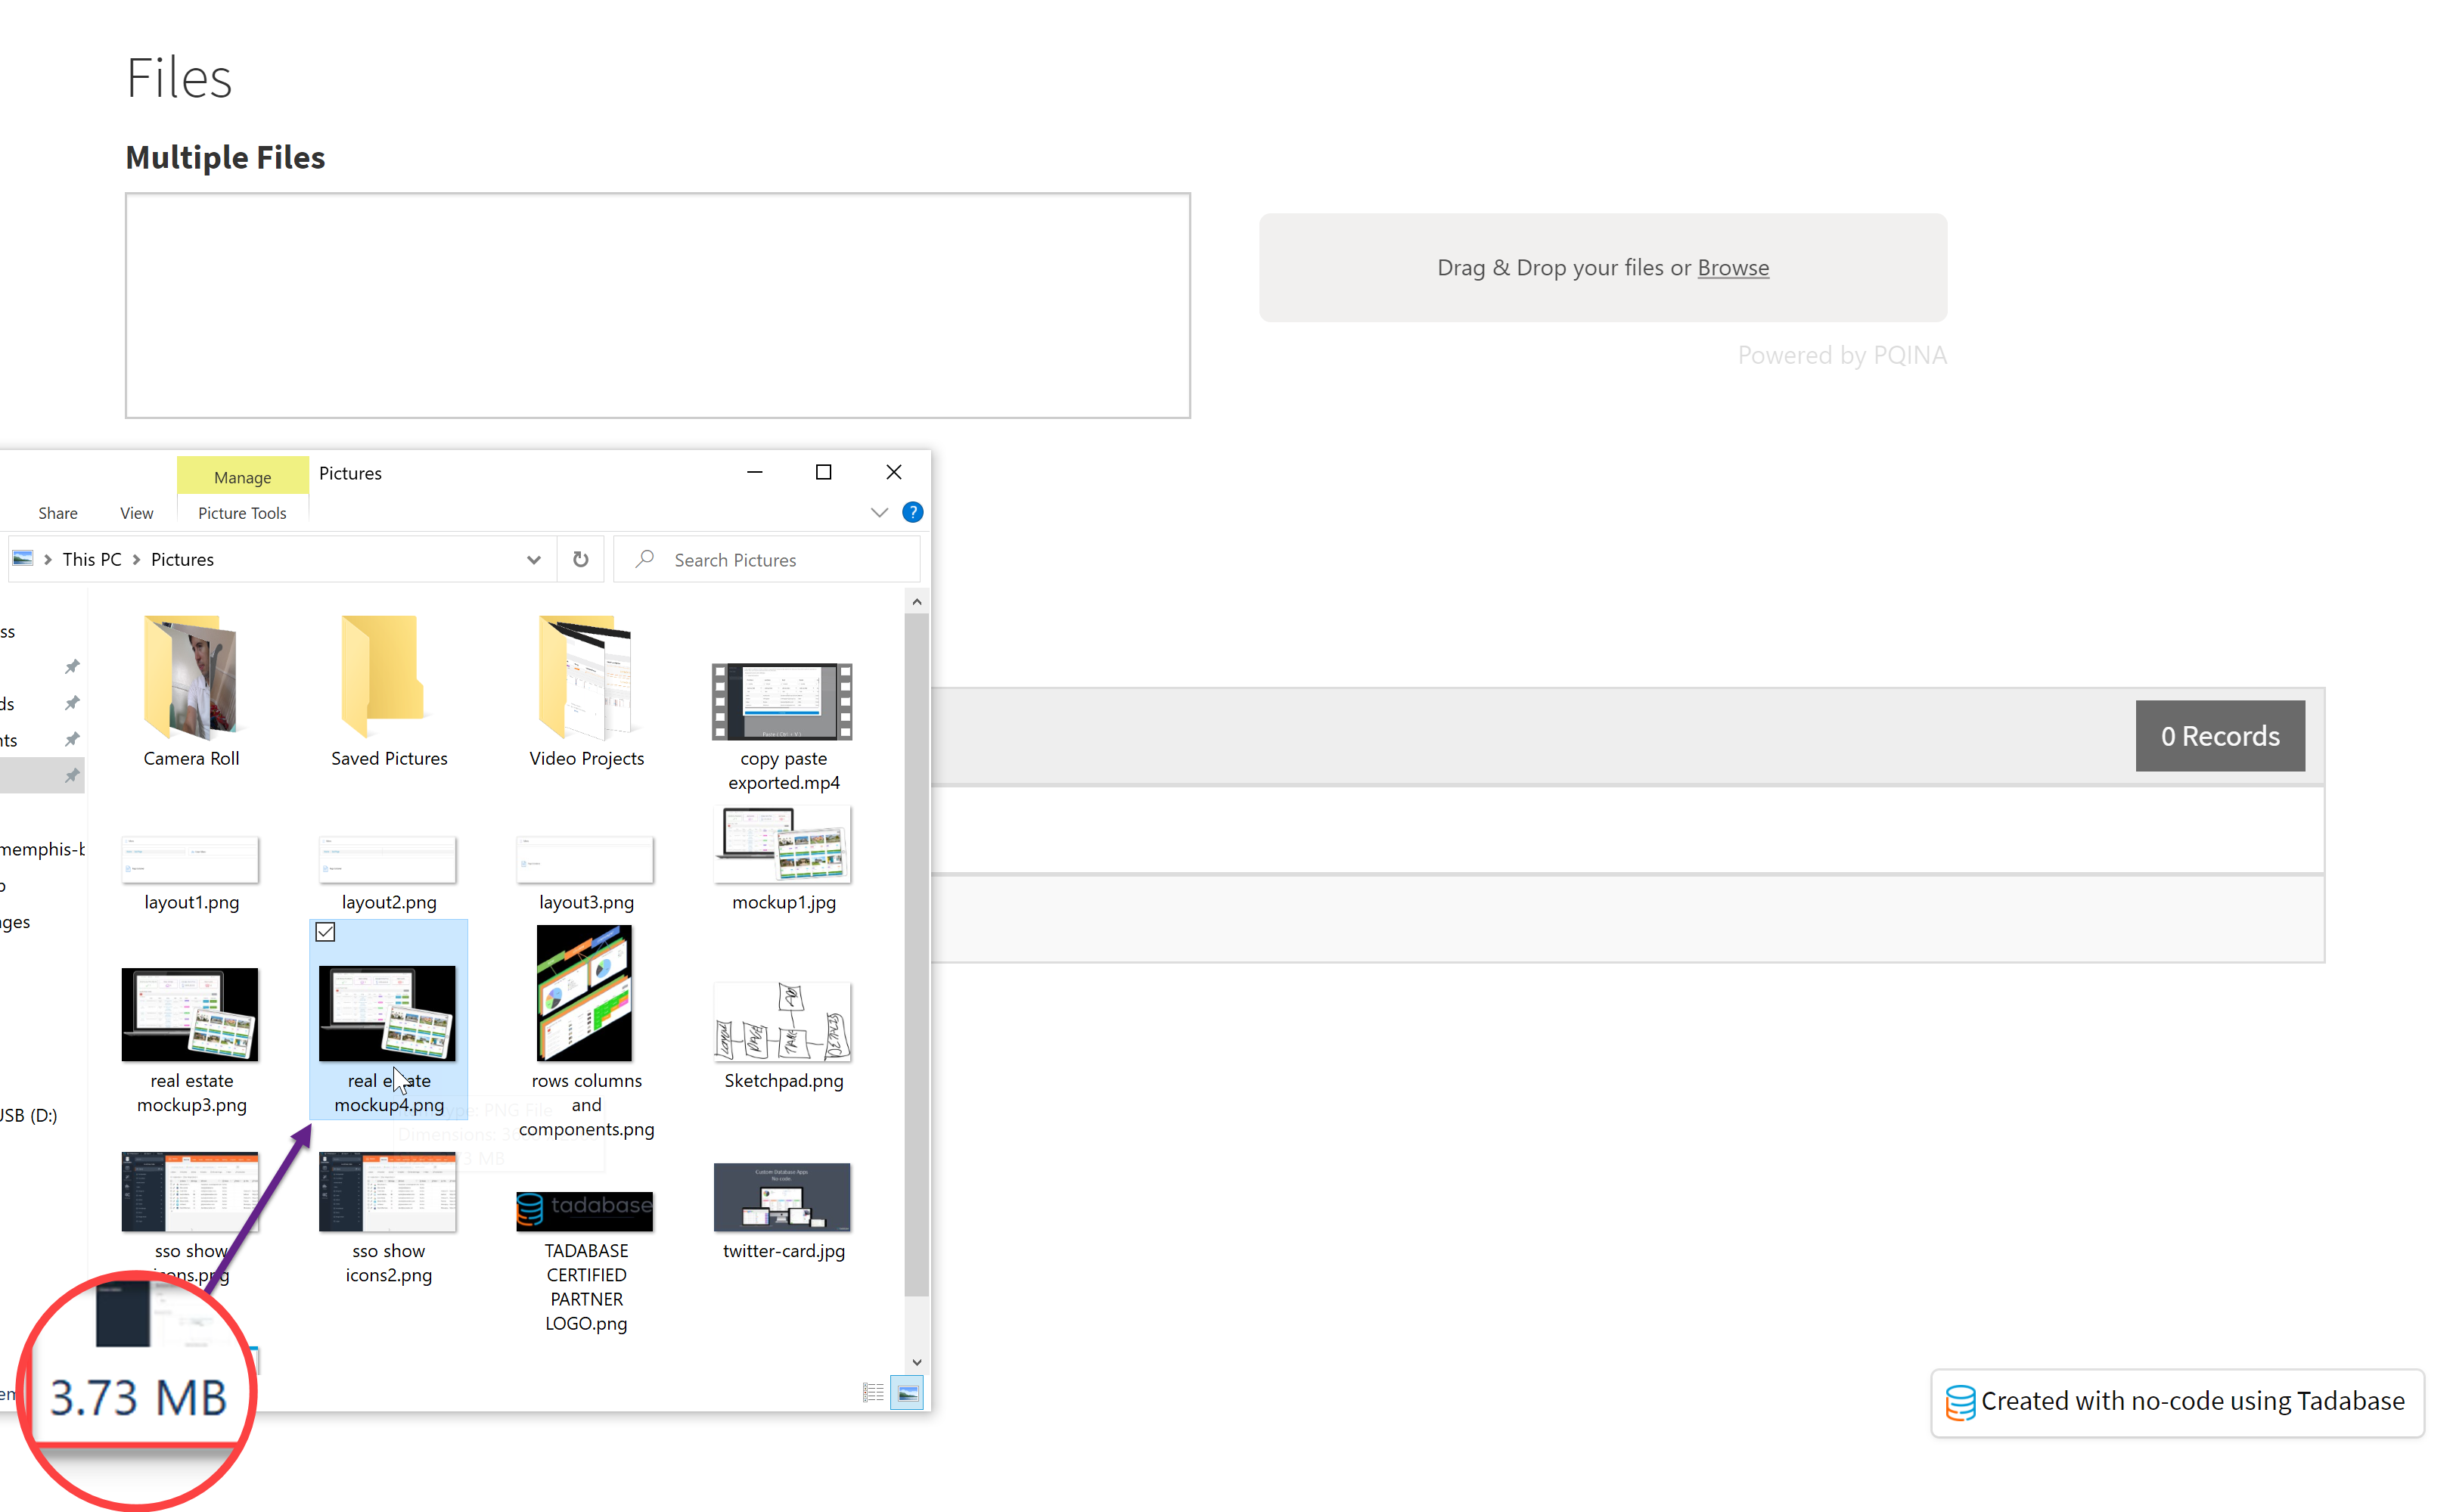
I was able to get a drag and drop file upload library working on a page but I’m stuck now. I used FilePond.

I don’t know what to do with the file once it’s been added to the upload section.

How do I create a record with it, or add it to a record?


Edit: I’ve been messing around with trying to upload a file/image with the Tadabase API. I see that images are not able to be uploaded - side note: why not? will this be changed in the future?

Anyways, I suppose I could still save the image as a file but I’m struggling with the code. I’m referencing this from developer.tadabase.com

var form = new FormData();
form.append("field_55", fileInput.files[0], "mockup1.jpg");

var settings = {
  "url": "https://api.tadabase.io/api/v1/data-tables/{{tableId}}/records",
  "method": "POST",
  "timeout": 0,
  "headers": {
    "X-Tadabase-App-id": "{{appId}}",
    "X-Tadabase-App-Key": "{{appKey}}",
    "X-Tadabase-App-Secret": "{{appSecret}}"
  },
  "processData": false,
  "mimeType": "multipart/form-data",
  "contentType": false,
  "data": form
};

$.ajax(settings).done(function (response) {
  console.log(response);
});

And trying to mash it together with this from FilePond…

FilePond.setOptions({
    server: {
        url: 'http://192.168.0.100',
        process: {
            url: './process',
            method: 'POST',
            withCredentials: false,
            headers: {},
            timeout: 7000,
            onload: null,
            onerror: null,
            ondata: null
        }
    }
});

I took a look and have a few comments.

  1. This has a server side component to it which processes the files.
  2. The API will not work for this like in your edit.

But assuming you have a PHP server that can handle the file uploading, its actually quite simple.

Here’s the end result:

And here’s the code:

  1. Custom Header Code (Settings > Customer Header/Footer Code)

     <link href="https://unpkg.com/filepond/dist/filepond.css" rel="stylesheet">
     <link href="https://unpkg.com/filepond-plugin-image-preview/dist/filepond-plugin-image-preview.css" rel="stylesheet">
    
  2. Custom Footer Code

     <script src="https://cdnjs.cloudflare.com/ajax/libs/jquery/3.3.1/jquery.js"></script>
     <script src="https://unpkg.com/filepond/dist/filepond.min.js"></script>
     <script src="https://unpkg.com/jquery-filepond/filepond.jquery.js"></script>
    

Javascript of the page:

$(function(){	
	    $('.my-pond').filepond();
	    $('.my-pond').filepond.setOptions({
	    	server: {
	    		url: 'https://tadabase.world/index.php'
    		
    	},
 
    	onprocessfile: function(error, file) {
			$('#field_block_field_54 input').val("http://tadabase.world/files/" + file.serverId + '/' + file.filename);
            angular.element(jQuery('#field_block_field_54 input')).triggerHandler('input');
    	},

    	onremovefile: function(error, file) {
    		console.log('File removed: [' + error + ']   file: [' + file.id + ']');
    		if(file.id in uploaded) delete uploaded[file.id];
    		
    	}
    	
    });
  
  });

For now (for testing), feel free to use the server URL, but I’d recommend to soon use your own server. This server in this code was spun up for the puroses of demoing only. Please do not store files in there as I will be deleting it. You can use your own server by simply downloading this and uploading it to your own server.

Make sure to edit the config.php file to match your tmp path or make any other changes.

As another side note, keep in mind sometimes when copying code from here the quotation marks don’t copy correctly.

Edit: I must add this is a very first rough go at this. There are security concerns and someone with the URL and knowledge can delete the file. You might want to remove the delete methods from the PHP code. I think this library does have additional methods of securing the files by moving it to a permanenet directory. I simply haven’t had a chance to review more in depth yet.

1 Like

Thanks Moe,

I think for implementing this, it wouldn’t be worth it. The interface is nice but it’s pretty much the same amount of steps as the native file uploader. Plus the main benefits would be for images. Specifically multiple images at once saving to 1 record, which I’m assuming is not possible right now.

Do all of these uploading libraries require a separate server to process the file? This one makes it sound like you can attach it to an existing input but I’m sure I’m missing something.

https://www.dropzonejs.com/

I believe DropZone works the same way as well. We’ve spoken to many users that can likely benefit from this so I just wanted to add some additional details here.

I think the main feature here would be that you can resize images dynamically plus multi file upload.

For example, here you can upload several files and save the list of URL’s. Then you can run an Integromat Scenario to split the images into unique records.

Another example is image resize, in this image you can see I’m uploading a 3.73 MB file:

Here it is being transformed into a very small image rather quickly.

In case anyone wants the ‘Helper App’ you can copy this into your account for testing.

Click here to copy this app. .

I agree there’s still some great benefits. Thanks for the app to copy!

Can you go explain how to setup a server? What service are you using for that? When you have time of course.

You can use just about any hosting company. We use for Tadabase AWS for everything, but for this example I wanted it specifically not on our main infrastructure so I used DreamHost.com

Really simple what I did:

  • Add a new Domain to Dreamhost
  • Set the DNS of your domain to the NameServers they provide (ns1.dreamhost.com, ns2.dreamhost.com, ns3.dreamhost.com)
  • Add a Free SSL Certificate to the domain from within your domain portal in Dreamhost.
  • Enable FTP uploads for the user hosting your domain and maybe even remove secure SSH hosting so its easier to login.
  • Download FileZilla and login to your domain using the credentials from your Dreamhost Panel
  • Upload that PHP Started kit and you’re done.

You can do this essentially with any hosting provider, I happen to use DreamHost for this example.

WHen testing if you have a local PHP environment set up you can test it that way as well by just using localhost. A bit beyond the scope of this post, but here’s a great video on doing this.

Oh man, sorry, I was way overthinking it.

@moe

I’m all set up but clicking the saved URL results in a 404. I tried changing the URL in the JS from /files/ to /tmp/ and /uploads/ but no luck. I have not changed anything in config.php

https://dataflowstudios.tadabase.io/file-pond-demo#!/single-file-upload

I can see folders created in /tmp/ with my uploaded images. /uploads/ is empty

// where to write files to

const TRANSFER_DIR = 'tmp';

const UPLOAD_DIR = 'uploads';

const VARIANTS_DIR = 'variants';

$(function(){	
        FilePond.registerPlugin(FilePondPluginImagePreview);
       
         $('.my-pond').filepond({
                allowMultiple: false,
                allowImagePreview: true
                
         });
	    $('.my-pond').filepond.setOptions({

	    	server: {
	    		url: 'https://upload.dataflowstudios.com/index.php'
	    		
	    	},
	 
	    	onprocessfile: function(error, file) {
				$('#field_block_field_54 input').val("https://upload.dataflowstudios.com/files/" + file.serverId + '/' + file.filename);
                angular.element(jQuery('#field_block_field_54 input')).triggerHandler('input');
	    	},

	    	onremovefile: function(error, file) {
	    		console.log('File removed: [' + error + ']   file: [' + file.id + ']');
	    		if(file.id in uploaded) delete uploaded[file.id];
	    		
	    	}
	    	
	    });
	  
	  });

I apologize, I forgot that I had changed the location from tmp to files.

You need to update your code so the URL is tmp not files.

For example: “https://upload.dataflowstudios.com/tmp/c52ef4bddde0db0c0459514822bdb7f1/screenshotnimbuscapture2020111122_13_33.png

Another thing I noticed is that file names that contain dots and dashes get stripped, that can also cause some issues. I think there is a plugin that can rename files prior to uploading which I’d recommend to ensure the file name doesn’t create a dead link.

Hmm it must have been striping the dots and dashes. I had tried changing files to tmp in the url.

Multiple Image Upload Working

2 Likes

WHOAA!! Awesome! :blush:

You used Integromat?

Yup. Integromat + this

@moe

I’m lost again on the file renaming…seems crazy to me that this can’t accept special characters but oh well.

I added this code but when the image gets uploaded, ‘$’ is included in the name and it’s missing the actual file extension.

$('.my-pond').filepond.setOptions({
    fileRenameFunction: (file) => {
        return `my_new_name${file.extension}`;
    }
});

Here’s the entire code for the page

$(function () {
    FilePond.registerPlugin(FilePondPluginImageResize, FilePondPluginImageTransform, FilePondPluginImagePreview, FilePondPluginFileRename);
    $('.my-pond').filepond({
        allowMultiple: false,
        allowImagePreview: true,
        allowImageResize: true,
        imageResizeTargetWidth: '500',
        imageResizeMode: 'cover'
    });
    $('.my-pond').filepond.setOptions({
        server: {
            url: 'https://upload.dataflowstudios.com/index.php'
        },
        onprocessfile: function (error, file) {
            $('#field_block_field_68 input').val("https://upload.dataflowstudios.com/tmp/" + file.serverId + '/' + file.filename);
            angular.element(jQuery('#field_block_field_68 input')).triggerHandler('input');
        },
        onremovefile: function (error, file) {
            console.log('File removed: [' + error + ']   file: [' + file.id + ']');
            if (file.id in uploaded) delete uploaded[file.id];
        }
    });
    $('.my-pond').filepond.setOptions({
        fileRenameFunction: (file) => {
            return `my_new_name${file.extension}`;
        }
    });
});

Try this (moved the code into options.)

Also, simply renaming it to the same name minus some characters which are being removed.

$(function () {
    FilePond.registerPlugin(FilePondPluginImageResize, FilePondPluginImageTransform, FilePondPluginImagePreview, FilePondPluginFileRename);
    $('.my-pond').filepond({
        allowMultiple: false,
        allowImagePreview: true,
        allowImageResize: true,
        imageResizeTargetWidth: '500',
        imageResizeMode: 'cover'
    });
    $('.my-pond').filepond.setOptions({
        
        
        fileRenameFunction: (file) => {
                 var newFileName = file.basename.replace(/[^\w\s!?]/g,''); 
            return newFileName + file.extension;
        },
        
        server: {
            url: 'https://upload.dataflowstudios.com/index.php'
        },
        onprocessfile: function (error, file) {
            $('#field_block_field_68 input').val("https://upload.dataflowstudios.com/tmp/" + file.serverId + '/' + file.filename);
            angular.element(jQuery('#field_block_field_68 input')).triggerHandler('input');
        },
        onremovefile: function (error, file) {
            console.log('File removed: [' + error + ']   file: [' + file.id + ']');
            if (file.id in uploaded) delete uploaded[file.id];
        }
    });
   
});
1 Like

That’s perfect, thanks!

Unsure if it’s related to the file renaming but I get a 404 when trying to go to the url created from a .jpeg uploaded from my phone.

PNG from my phone is fine.

I’ll need to investigate tomorrow.

I can’t seem to replicate. Let me know what you discover

Are you using iPhone or Android?

Android phone and was testing using built in camera